Techniek - Wiellagers Dodge
![]()
Iedereen die wel eens de wiellagers van zijn Dodge truck heeft moeten vervangen weet wat een vreselijk karwei dat kan zijn. Hoe hebben de Dodge-technici dat ooit kunnen bedenken? Dat is dan ook exact wat de persoon die onderstaand verhaal heeft geschreven, ook heeft gedacht. In dit artikel wordt uitgelegd hoe je de voorwiellagers van je Dodge kunt vervangen.
If you have ever owned a '75 to '79 Dodge truck, or have ever had to listen to someone who did complain about the front wheel bearings, you will appreciate this article. It seems our friends at Dodge had a little too much free time on their hands and thought they would invent this wonderful new design. I guess they didn't have as much free time as they thought because they fell a little short of genius and landed in stupid. I have owned a '79 W150 for a few years now and love the truck, I just hate the wheel bearings. Luckily I have found an easy (remember we are still talking about a Dodge, nothing is easy) way to change these suckers without spending my whole weekend or paycheck. Follow along as I show you my secrets, and stay tuned, I will be switching to Chevy knuckles and brakes soon.
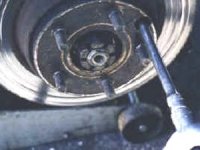
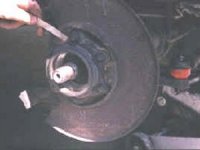
Removing the rotor There are two ways to get the rotors and bearings off. You can do it like this, or you can use a hub puller that will remove the outer bearing as it pulls the rotor off. Removing the bearing retainer bolts allows you to remove the rotor without disturbing the bearings (opmerking: hiervoor heb je een 12-kant 3/8 dop voor nodig die klein genoeg is om door het gaatje te kunnen). If you are going to replace the bearings, use the hub puller. Otherwise you will never get the outer bearing off.
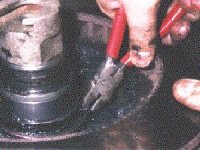
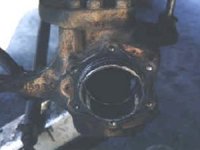
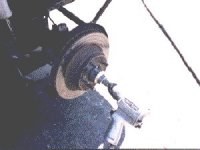
Removing the bearings 1 Once you have the rotor off, you can turn your attention to the inner bearing. The cage and rollers must be removed and the grease seal cut out. This gives the pullers room to grab the bearing shell. After you get the seal out of there, clean the area really well. This will prevent slipping of the puller jaws.
Removing the bearings 2 I have found that believe it or not, that the Craftsman three jaw puller set works the best. I have tried Snap-On's pullers with no luck. The real trick comes from sharpening the small side of the arm and using either rope or wire to hold the pullers jaws in place. You Must tighten the retaining bolts on the puller before you start to apply force.
Removing the bearings 3 After having had other pullers explode on me (the Snap-on set), I learned this little trick from an old timer. A greasy rag wrapped tightly around the pullers will help keep any shrapnel inside. If the pullers jaws slip, you'll have to reposition them again. If they pop a lot, try re-sharpening the jaws again. The first 1/32" is the hardest to get. After that you're home free.
Setting up the preload The next step is to set up the pre-load. The retainer must have about .006" clearance with the bearing races and spacer installed to be correct. If there isn't enough, have the retainer turned on a turret lathe until they fit. Removing the knuckle is the best way to do that. Most big machine shops can do this for you. This step is crucial to bearing life. Once that is set, put the seal in the retainer, slide it on the rotor and press the bearings on.
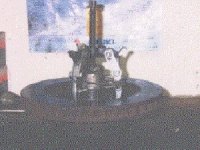
Optional : replacing the balljoint 1 If you have never seen this part on your Dodge, you must be living right. This is the bare knuckle. If your balljoints are O.K., skip the next few steps. Mine were fried so I replaced them while I was in there. Once the steering is removed, you can pop the balljoints and remove the knuckle from the axle. I used a pickle fork and a three pound sledge. Remember, pound down the upper ball joint pin and place the pickle fork between the lower ball joint and the axle.
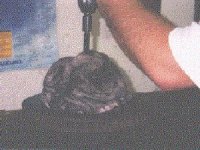
Optional : replacing the balljoint 2 Don't do this! If you don't have a press, find one. Pressing the balljoints in and out is easy with a press. It's murder in a vise. I ended up bending the extension bar right after this. A hammer is tempting but don't do it. The last thing you want is a bent knuckle, right! A small ball joint press is available from JCWhitney for about $90.
Optional : replacing the balljoint 3 Here is the other reason you never want to try to press balljoints in a vise. Literally two seconds after I took this picture, my vise EXPLODED. Now I have to buy a press and a vice. Not the cheap way to do it. Never push your tools beyond what they were intended to do unless you are in the boonies and you have no choice.
Rounding up Once you have all that done, it's time to button up the job. The axle-nut goes on @ 100 ft-lbs. Replace the cotter pin and re-install the caliper. Remember, if you replaced the balljoints, set the adjustment! Loose balljoints will ruin everything you just did. If you can't find the special socket for this, you can make it out of a craftsman 3/4" 3/8"drive deep well socket by cutting the sides as needed.
Now that you know what goes into replacing the bearings, you have to ask yourself why Dodge did this? Remember, almost all the new 4x4s have similar bearings. Luckily the have improved them with time. I just wish there was a way to easily upgrade these older trucks to the better bearings. Like I said before, I looking into switching to Chevy knuckles and brakes on my Dodge Dana 44. If it's possible, I'll be doing it soon. Keep watching.
Bron: Offroad Exchange
Auteur: Bill Cooke[ vorige pagina ]
![]()